When it comes to repairing roof damage, several factors influence cost. These include shingle type, roof pitch, and size.
Generally speaking, flat roofs and single-story gable roofs are the least expensive to repair. The cost of repairs increases with the size and complexity of the roof. Contact Red Stick Roofing Of Louisiana for professional help.
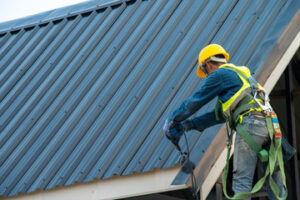
Between strong winds, heavy hail and snow, prolonged exposure to the sun’s rays, and age, roof shingles take quite a beating over time. Inspecting your roof and replacing a few shingles on a regular basis will help ensure that it stands up to the elements and keeps your home safe.
A few signs to watch for include bruising, blistering and cracking. Bruising occurs when the impact of a severe storm loosens the shingle’s granules, leaving it with a discolored appearance. The loss of granules also affects the shingle’s weather resistance, making it a good idea to replace bruised shingles as soon as possible. Blistering, which appears as bubbled areas where the granules are missing, allows moisture to seep beneath the shingle and into your home. If left unattended, this issue can escalate into a full roof replacement project.
Lastly, shingles may develop cracks that run horizontally across the surface of the shingle. Cracking is a common sign of shingle damage and could be caused by high winds, temperature changes, or simply drying out over time. Regardless of the cause, this cracking can allow water to enter your home and lead to serious structural problems down the road.
While it is possible to rescue cracked shingles, it’s best to replace them as soon as you notice them. This prevents a minor issue from becoming a major one and enables you to enjoy your roof’s lifespan to the fullest.
Replacing a shingle is relatively easy and requires only a few tools and some basic roofing knowledge. However, if you’re not comfortable working on your roof or the damage is extensive, it’s a job that should be left to a professional.
Start by locating the shingle with the problem and using your pry bar to remove it. Then, use the pry bar to lift up the shingle above it and withdraw the nails that hold it in place. Repeat this process for the shingle above it and the one above that. Be sure not to yank the nails too hard or you could puncture the new shingle.
Leaking Gutters
Gutter systems are intended to collect and carry away rainwater, preventing it from damaging the siding, foundation, and soil around your home. But leaking gutters can cause serious damage to your home and lead to expensive repairs. If you’re experiencing leaking gutters, you should inspect the area as soon as possible to prevent water damage and expensive repair bills.
Leaking gutters are often caused by loose or cracked seams. These cracks can be caused by a variety of factors, including corrosion, excessive pressure from the weight of debris and water, or even ice dams. If you suspect that a seam is loose or cracked, you should carefully examine the area and apply sealant to the seam to repair it.
Another common cause of leaky gutters is a missing or damaged downspout. If a downspout is missing or damaged, it’s crucial to replace it immediately to keep rainwater from flowing into your home’s foundation or basement. You should also check to make sure that your downspouts are directing water away from the foundation and into an area that won’t cause flooding or damage your landscaping.
Clogged gutters can also cause major problems. They can force water to flow over the edges of your gutters, causing them to sag. This can leave open areas where the gutters meet the fascia of your home, which may rot and create leaks into your attic or basement. Leaking gutters can also damage your driveway, erode landscape beds, and wash away mulch and dirt from the bottom of your home’s foundation.
If you have a sagging gutter, the first step to take is to get up on a ladder and sight down the length of the gutter to see if you can spot an issue. You may be able to correct the problem by proping a long, straight 1×4 or 2×4 brace under the section that’s sagging. This should help to support the gutters and remove the sagging. You can also add a gutter downspout extension to redirect the water away from your house’s foundation and into a drain or flower bed.
Damaged Flashing
A key component of your roof, flashing is made from a metal strip that prevents water leaks around chimneys, vents, skylights, and other roof penetrations. Over time, the flashing can become damaged. If this happens, it can lead to a host of problems, including health hazards from mold growth and decreased energy efficiency. This is why it’s important to take the time to inspect your flashing for damage and repair it promptly.
The most common sign that your flashing has become damaged is a leaking roof. If you notice discoloration on the ceiling or walls, it’s likely that a leak in your roof is caused by faulty flashing. The flashing can be damaged by inclement weather, physical damage, or shoddy construction. It may also deteriorate due to age or a lack of regular maintenance.
Faulty flashing can be a particularly serious problem during the winter. Heavy rains and the freeze-thaw cycle can cause moisture to seep under the flashing and damage it. The best way to prevent a flashing failure is to have your roofing contractor check the condition of the flashing regularly.
Depending on the severity of the damage, roof flashing repairs can be very easy or a bit more involved. A professional roofing contractor will ensure that your flashing is completely watertight and protects your home from moisture infiltration. To complete the repair process, your roofing contractor will remove any dirt, debris, or old caulking from the affected area. They will then patch holes, replace sections of flashing, or apply roofing sealant to ensure that the area is completely watertight. Ideally, you should schedule regular inspections and maintenance to identify any flashing issues before they have the chance to turn into costly leaks. Having a trusted roofing company like Lyons Roofing perform these routine inspections can help you avoid expensive roof repair in the future. The right roof maintenance plan can extend the lifespan of your roofing and significantly reduce the risk of leaks. If you do spot a leak, call the roofing experts at Lyons Roofing for prompt, effective repairs.
Damaged Siding
When hail or high winds strike your siding, it can leave behind holes or dents. These imperfections can be repaired relatively easily with a bit of time, but homeowners should be aware that severe storm damage to your siding can lead to mold and wood rot that requires complete replacement.
Moisture penetration through damaged siding can cause warping, buckling and algae and mold growth on the inside of your home. These problems are most common on homes with siding made from wood or clad in vinyl, but they can occur in other types of siding as well.
In addition to moisture problems, your siding may become damaged due to pests and other environmental factors. While these issues are usually easier to fix than a damaged roof, they should be addressed as soon as you notice them.
Siding isn’t as hardy as a roof, so it needs to be properly maintained and repaired in order to last for as long as possible. Regular cleaning, inspections and occasional repairs are essential to keep your siding looking good and protecting your home.
Before performing any type of repair, make sure the severe weather has passed and it is safe to work outside. It is also a good idea to wear gloves and safety glasses when working with tools like tin snips, utility knife, wood shims, hammer or pry bar, as these items can pose a risk of injury if not handled properly.
Start by removing the existing piece of damaged siding with a utility knife, using caution not to cut through any underlying materials. If you can’t find a matching piece, use foil tape to create a new seam and a patch. Once the patch is in place, cut a new piece of siding to fit and trim the nailing strip, if needed.
Next, de-gloss the surface of the damaged board by wiping it down with a damp cloth. After this, apply vinyl patching material to the hole or dent with a plastic putty knife (never metal, which could damage the siding). Apply the patching in two thin layers and allow it to dry between applications. After the patch is dry, lightly sand it, starting with 100-grit and finishing with 220-grit sandpaper, to smooth and prepare for a new coat of paint.